
User manual
The usage is very simple, when you launch the widget, press START or MENU. Select a device and an action, then press START button to launch. The widget will call the url that you configure for this action. "OK", "KO" with the HTML error code or a return value is displayed.
To call a new action, press MENU to select a new device/action.
- "START" can be START button and/or a "tap" on screen for touch watches.
- "MENU" can be a long press on UP button, or on bottom right button (Vìvoactive® 4), or on the screen (touch watches)...
Go to Screenshoots section to get more details and screenshots.
Configuration guide
The configuration is done in Garmin ConnectIQ application, in the settings menu of the widget. There is 36 lines that can be set as a "flat" JSON string like :
» Example (basic) : {deviceName:"Gate", actionName:"Open", url:"http://my.url?to=open"}
This first example create an action that is named "Open", to call an API with the url "http://my.url?to=open". This action is put in a group named "Gate" (the deviceName).
» Example (with icons and autonext) : {deviceName:"Cinema", deviceIcon:7, autonext:true, actionName:"TV", actionIcon:11, url:"http://my.url?tv=on"}
This second example create an action that is named "TV", to call an API with the url "http://my.url?tv=on". This action is put in a group named "Cinema".
In addition, an icon is associated to the device, another icon to the action, and the function "autonext" is activated.
Note that because garmin doesn't provide a builtin function to parse JSON, I had to write it by my-self, so there are some small differences with a standard json:
- The "name" part of an objet can be defined without "double quote" if it start with a letter and have only letter, digit, -, _ or . Ex : {name:"value"} is ok.
- The only accepted space char is "whitespace", no tab, carrier return etc ...
- It is accepted there is no "whitespace" beetween any element of the grammar. Ex : {nameX:"value",nameY:72,nameZ:true} is ok, while the standard need { name : "value" , nameY : 72 , nameZ : true }
- Some escaped characters are not interpreted in a string (\\, \/ and \" are OK, but \b \f \n \r \t and \u are not
Here is a short description all parameters availables, (see next section for details) :
| Parameter name | Quick description |
|---|---|
| deviceName [mandatory] | Set the name of device. A device can be seen as a set of actions. |
| deviceIcon | Permit to associate an icon to a device. |
| autonext | Function to select automatically next action of the device after launching. |
| actionName [mandatory] | Set the name of the action that is displayed. |
| actionIcon | Permit to associate an icon to an action. |
| url [mandatory] | Set the url to be called. |
| autolaunch | Function to automatically launch immediately after selection. |
| method | HTTP method to use (GET, PUT or POST). |
| POSTcontent | Content to send with HTTP request. |
| resDisplay | Permit to choose how to display the result. |
| media | Permit to force the media to launch the request. |
| headers | Options to set custom http header. |
| Deprecated, see "headers" option. |
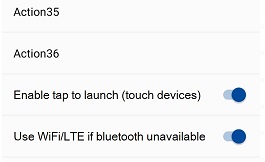 There is two options more, available at the end of settings in ConnectIQ :
Settings
- deviceName [mandatory]
- Type : String
- Description : Set the name of the device to which the action belongs. It permit to group some actions. It is possible to group all actions under an single device, it permits to avoid device menu selection.
- Example :
{deviceName:"The name of my device", ...}
- deviceIcon [optionnal]
- Type : Integer
- Default : 1
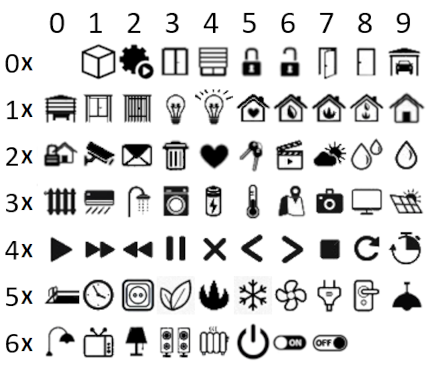
- Description : Select an icon to be displayed next to the name of the device (cf icons list). Have to be put on the first mention of the device.
- Example :
{deviceName:"Dev1", deviceIcon:4, ...}
{deviceName:"Dev1", deviceIcon:5, ...}
{deviceName:"Dev2", ...}
{deviceName:"Dev3", deviceIcon:6, ...}
If you define all these previous lines :
➔ Dev1 will have icon #4 (second line is not taken into account)
➔ Dev2 will have icon #1 (default)
➔ Dev3 will have icon #6 - autonext [optionnal]
- Type : Boolean [true|false]
- Default : false
- Description : When launching an action, the next action of the device is automatically selected. Applies to a device and must be positioned on the first mention of the device. Can work with autolaunch.
- Example :
{deviceName:"Dev1", autonext:true, actionName:"On", ...}
{deviceName:"Dev1", actionName:"Off", ...}
If you define all these previous lines, when you launch action "On", the action "Off" will be automatically selected and ready to launch.
- actionName [mandatory]
- Type : String
- Description : Set the name of the action.
- Example :
{deviceName:"My TV", actionName:"On", url:"https://my.api?action=on"}
- actionIcon [optionnal]
- Type : Integer
- Default : 2
- Description : Select an icon to be displayed next to the name of the action (cf icons list).
- Example :
{deviceName:"Dev1", actionName:"Off", actionIcon:6, ...}
- url [mandatory]
- Type : String
- Description : URL to be launch. Garmin doesn't support https://username:password@my.url.com format. See basicAuth setting
- Example :
{... url:"https://my.api?action=on"}
- autolaunch [optionnal]
- Type : Boolean [true|false]
- Default : false
- Description : Applies to the action. The action is launched immediatly after selection. Can work with autonext. Doesn't apply if there is only one action defined.
- Example :
{deviceName:"Dev1", actionName:"Blue", autonext:true, autolaunch:true, ...}
{deviceName:"Dev1", actionName:"Red", autolaunch:true, ...}
{deviceName:"Dev1", actionName:"Yellow", ...}
If you define all these previous lines :
➔ If you select the action "Blue", the action will be launched immediately after selection.
➔ Because Dev1 is "autonext", action "Red" will be automatically selected. It will also automatically launched.
➔ Because Dev1 is "autonext", action "Yellow" will be automatically selected but not launched. It will wait a "START" press.
- method [optionnal]
- Type : String ["GET"|"POST"|"PUT"]
- Default : "GET"
- Description : Set the HTTP request type.
- Example :
{deviceName:"Dev1", actionName:"Blue", method:"POST", ...}
- POSTcontent [optionnal]
- Type : String that contains a json
- Default : "{}"
- Description : Set the content of the request. The content is sent regardless of the method (GET, POST and PUT). It must contain a JSON type string. Be careful to escape the <"> character in the content if necessary.
- Example :
If you want to send this JSON : {"args":["3"]}
➔ you have to configure {..., POSTcontent:"{\"args\":[\"3\"]}", ...}.
If you want to send parameters as application/x-www-form-urlencoded, please set option "headers" and configure parameters as a json here, it will be convert by garmin before sending.
For example, if you want to send : ?arg=3&text=HelloWorld
➔ you have to configure {..., POSTcontent:"{arg:3,text:\"HelloWorld\"}", ...}.
- resDisplay [optionnal]
- Type : String
- Default : ""
- Description : You can put a "JSON path" to fetch the element to display. If not defined, only the message OK or KO + error code is displayed as return. If defined to "text", the response is displayed as it is (pay attention to the length of the response...)
- Example :
With a result {"res1":"xxx", "res2":"yyy"}, xxx is displayed with {..., resDisplay:"res1"}.
With a result {"res1":{"subres":"xxx"}}, xxx is displayed with {..., resDisplay:"res1.subres"}
With a result {"myresult":[{"id":"xxx"},{"id":"yyy"},{"id":"zzz"}]}, xxx is displayed with {..., resDisplay:"myresult[0].id"}
If you want to display the whole result {..., resDisplay:"text"}
- media [optionnal]
- Type : String ["BT"|"WIFI-LTE"]
- Default : not defined
- Description :Force the media that is used to send the request. If you use this option, the specified option will define the only media that will be used. If not defined, the default behavior is to use Bluetooth if connected, else try WiFi/LTE. Trying WiFi can can be disabled in general options of the widget. This option take precedence on general options.
Note that, unlike Bluetooth, WiFi/LTE doesn't require HTTPs, force Wifi is a solution if you can only use HTTP. - Example :
With {...,media:"BT"}, Bluetooth will be used if connected, but WiFi will never be tried even if the general option "Use Wifi/LTE if bluetooth unavailable" is enabled.
With {...,media:"WIFI-LTE"}, only WiFi/LTE will be used.
- headers [optionnal]
- Type : String that contains a json
- Default : "{}"
- Description : This option permit to set custom http headers. The main usage is to set the "Content-Type" and "Authorization" headers, but it could be use to set custom headers. Garmin do some checks that prevent to send everything you want, and these checks are unfortunately not documentated... To use the option, you need to configure a json with pairs of "name of the headers":"content of the header". For example
- Example :
If you want to send these two headers :
Authorization: Basic YWxhZGRpbjpvcGVuc2VzYW1l
Content-Type: application/x-www-form-urlencoded
➔You need to configure {...,headers:"{Authorization:\"Basic YWxhZGRpbjpvcGVuc2VzYW1l\",\"Content-Type\":\"application/x-www-form-urlencoded\"}",...}
- For "Content-Type" header :
Garmin only permit to configure these two Content-Type
Content-Type: application/x-www-form-urlencoded
Content-Type: application/json
All others "Content-Type" will result to a -200 error. By default I always set application/json, you don't need to configure it.
- Note : To replace the old basicAuth option :
The https://username:password@my.url.com format to do basic authentication is not supported by Garmin. You have to put a base64 encoded string that represent your "username:password". This online tool : www.base64encode.org can help you to convert your string to base64. - Example :
If you try to do https://john:pwd@my.url.com, you want to use "john" login and "pwd" password to do basic authentication with my.url.com.
➔ so you have to configure {..., url:"https://my.url.com", headers:"{\"Authorization\":\"Basic am9objpwd2Q=\"}", ...} because "am9objpwd2Q=" is the base64 encoded string of "john:pwd".
To send "mylogin:MycomplexPassword"
➔ you must send headers:"{\"Authorization\":\"Basic am9objpwd2Q=\"}"
- basicAuth [DEPRECATED]
- Do not use anymore, this option has been replaced by "headers" that could do the same (and much more).